Wednesday, December 30, 2020

Corzetti


Homemade Corzetti with Pumpkin Ginger and Pistachio


     For Christmas my sister in law got me a corzetti stamp...


     I'll be honest, I didn't know what it was.  It is obviously a stamp of some sort, I was thinking shortbread, which would work.  However it is actually for making pasta.  As you can see, one side is decorative the other says Davis.

     I use a food processor to make my pasta dough instead of the traditional "volcano" method but either will work.  The trick is to let the dough rest so the gluten relaxes and can be rolled out.  The first time I rolled it out to about three sixteenths of an inch which I though was a little thick but still good for my first time.

     I watched Pasta Grannies on you tube to get the technique down and all in all it isn't that bad to make.  I did find that it helped to stick the stamps in flour after about four pieces to keep from sticking.  I assume eventually that won't be needed as the stamps get seasoned...

     Now, get in the kitchen and cook something!


Pasta Dough
     1 c Semolina Flour
     1 1/4 c All Purpose Flour
     1 Egg
     1/4 c Water
     1/4 c White Wine
  1. Combine all in a food processor and process until it forms a ball.
  2. Remove and cover with plastic wrap.   Let the dough rest for 15 minutes.
  3. Roll dough out to about an 8th of an inch.  Then cut the dough o to circles and press in your stamp for corzettis.
  4. You can also cut the dough and form it into your favorite pasta shape.  There are hundreds if not thousands to choose from.
  5. Bring a pot of salted water to a boil and drop in your fresh pasta.
  6. Depending on the thickness and size of your pasta it can take anywhere from 3 to 12 minutes to cook.  Keep an eye on it and test it until it is cooked your satisfaction.
  7. Add sauce and enjoy!
Roasted Pumpkin and Ginger Pistachio Sauce 
     1 Small Pumpkin, peeled, seeded and diced
     1 1-inch Piece of Ginger, peeled and sliced
     2 T Olive Oil
     1 t Salt
     2 c Vegetable or Chicken Stock
     1/4 c Pistachios 
     1/2 c Parmesan, grated
  1. Pre-heat oven to 400 degrees
  2. Spread pumpkin and ginger on a baking sheet and drizzle with olive oil and salt
  3. Roast for 40 minutes, then remove from oven and let cool slightly.
  4. Meanwhile, bring stock to a boil and the reduce to a simmer
  5. Place pumpkin and ginger mixture in a blender with the stock and puree until smooth.
  6. Add pistachios and blend about 15 seconds.
  7. Pour over pasta and toss pasta to coat.
  8. Sprinkle with grayed parmesan to serve.     
     

Thursday, December 24, 2020

Carrot Tartar

Carrot Tartar


      This is from Chef David Humme of Madison Park West in New York.   It presents very well, is yummy, healthy and fun.   What more could you ask for.


     Using an old food mill, I ground up some carrots and beets into a delightful fresh slaw, all ready for dressings and additions.   We used pomegranate seeds, carrot dressing, apple mustard sauce, sauteed mushrooms, capers with fresh bread and lettuce wraps to eat.  Other garnishes could be smoked fish, pickles or even chopped eggs.  Add as little or as much as you want!

     Now, get in the kitchen and cook something!

Carrot Vinaigrette

  • ½ c Carrot Juice

  • ¼ c Olive Oil

  • 1 T White Wine Vinegar

  • 1 t Chili Powder

  • ¼ t Cumin

  • Salt and Pepper TT

  •  

  1. Combine all and mix well


Apple Mustard Sauce

2 t Olive Oil

1/3 c Minced Shallots

1/2 c Water

1 c Apple Butter

1 T White Wine Vinegar

1 T Stone Ground Mustard

¼ c Real Maple Syrup

¼ c Apple, diced

Salt and Pepper TT


  1. Combine olive oil and minced shallots in a pan over medium-high; cook 2 minutes. 

  2. Whisk together apple butter, white wine vinegar, whole grain mustard and maple syrup, then add to pan. 

  3. Bring to a boil; stir in golden apples and Reduce heat; whisk 2 minutes. Stir in unsalted butter season to taste with salt and pepper.


Saturday, December 19, 2020

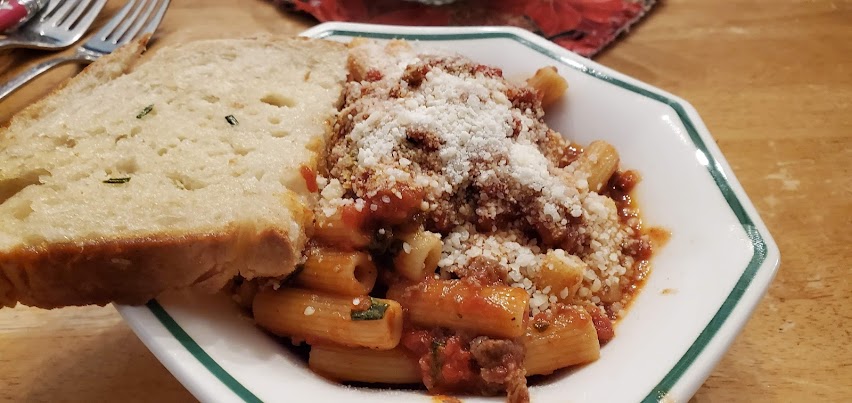
Rigatoni Bolognese with Garlic Rosemary Bread

Rigatoni Bolognese


        The snow is starting to fall and stick around a little, Christmas carols are on the radio and school is out for a couple weeks.  Bonus, I am off work from both jobs for 10 days... I hope I can handle it.  

        We are hoping to get outside and get some fresh air, hopefully it will be a nice family game time with everyone home.  Last night I made a quick pasta dinner.  I used a quart of homemade marinara sauce, but you could use your favorite store bought brand.  I then added a Quart of canned tomatoes, which is equivalent to a 28 oz. can of diced tomatoes from the store.  

        I started by browning ground beef, adding some chopped garlic and then the tomato sauce and tomatoes.  I used a large saute pan so the water would evaporate and thicken the sauce, it only simmered for about 30 minutes while I boiled some water to cook the noodles.  Some garlic rosemary butter brushed on fresh bread in the oven for garlic bread and supper was ready.

I always try to make extra of this so I can put some in the freezer for next time!

Now, Get in the kitchen and cook something!


 Rigatoni Bolognese
        1 lb. Rigatoni
        1 lb. Ground Beef
        1 qt. Marinara Sauce
        1 - 28oz can diced tomatoes
        3 cloves garlic, finely chopped
        2 T Fresh Basil, chopped
        Grated parmesan Cheese for serving
  1. Bring water to a boil and cook rigatoni according to package directions.
  2. Heat a large skillet over medium heat.
  3. Sauté the beef until it is browned, breaking it up with a wooden spoon.
  4. Add garlic and sauté about 2 minutes.
  5. Pour in marinara and tomato sauce and stir to combine
  6. Stir in the basil.
  7. Reduce heat to low, I have a splatter guard that I put over the pan at this point to reduce the mess from bubbling tomato sauce.
  8. When the pasta is done, drain it, reserving some of the water to adjust the thickness of the sauce as necessary.
  9. Toss the pasta with the sauce and serve with grated parmesan on the side.
Garlic Rosemary Bread
        6 Slices Fresh Bread
        1/2 c Butter Melted
        1 Clove Garlic, minced
        1 T Rosemary, chopped
  1. Pre-heat oven to 400 degrees
  2. Combine butter, garlic and rosemary
  3. Using a pastry brush, brush the bread on both sides
  4. Wrap the bread in tinfoil and place in the oven for about 15 minutes to heat through. 


Friday, December 18, 2020

Beef Cuban Picadillo

 Beef Cuban Picadillo with Fresh French Fries


        Chris Kimball's Milk Street Magazine is one of my favorite food magazines.  Similar to his Cooks Illustrated which I enjoyed in the past, there are a lot of interesting stories and food history as well as great illustrations and photographs. 

        If you sign up for the newsletter, you can also get occasional free recipes emailed to you.  If you have a subscription you can access all of the recipes on line.  A few days ago, this one was in my inbox.  I had what we needed, well mostly, and I was intrigued by his suggestion to serve it over french fries.

        Picadillo traditionally has raisins and green olives in it that add a salty sweet tang to the sauce for a refreshing different taste.  I made most of the sauce without them and made a separate meatless sauce with the olives and raisins.  I also made a healthier version for my wife as lettuce wraps, although I think she still had a few fries that I made in our new microwave air-fryer combo.  The main modifications I made were I used Kalamata olives instead of the green olives as that was all I had.  Also I used some canned whole tomatoes instead of fresh, and finally I used more tomato paste than called for (because, really what am I going to do with the rest of the can of paste other than put it the refrigerator and throw it away when it is black and dried up!) and I added a little extra water,.

Now, Get in the kitchen and cook something!


Cuban Beef Picadillo
        2 T Olive Oil
        1 Large Onion, diced
        6 Cloves Garlic, minced
        1 1/2 lb. Lean Ground Beef
        1/2 c Raisins
        1 T Cuman Seed
        1 t Oregano
        3 T Tomato Paste
        1/2 c Green Olives with Pimentos, chopped
        3 T Olive Brine
        1/2 c Cilantro, chopped
        3 Roma Tomatoes, chopped
        Salt and Pepper TT
  1. Heat oil in a large skillet.
  2. Add onion and sauté until it starts to brown
  3. Add garlic and sauté 1 minutes
  4. Add beef and cook until it is brown, use the spoon  to break it into smaller pieces.
  5. Stir in raisins, cumin, oregano and tomato paste.
  6. Stir in the olives, cilantro and tomatoes.
  7. Season to taste with salt and pepper.
  8. Serve with fries, as lettuce wraps, over rice or mashed potatoes, or a add a little broth and eat it as a soup with some fresh bread!


Air Fryer French Fries
        3 Large Russet Potatoes
        3 T Vegetable Oil
        Sea Salt to taste
  1. Cut potatoes into and fries and then put them in some cold water to rinse off the starch that will turn them brown
  2. Drain the fries and pat them dry, then toss them with the olive oil
  3. Place the fries in the air-fryer basket and season with some salt.
  4. Cook in the air-fryer per the instructions of your fryer.  I have a microwave, broiler airfryer combo and it took about 30 minutes to get crisp fries, I tossed them every 10 minutes or so to help them cook evenly.
  5. Alternately you could bake the fries in a 450͑ for 20 to 30 minutes.


Thursday, December 17, 2020

Laksa Noodle Bowl

Laksa with Chicken and Shrimp


        I am sure that just about everyone has heard of Anthony Bourdain who became famous in the late 90's for his first book "Kitchen Confidential".  He exposed some of the messier sides of working and living in the restaurant industry.  You either loved it or hated it, I loved it!  

        Not only did he discuss a lot of things I could relate too, he was also philosophical and irreverent in his opinions about food and life.

        He went on to have several food related shows and have quite a career before his untimely death a couple years ago.  A great memoir to him was published a year after his death with many pictures and quotes of those who had met him and whose lives he had touched.  I admit I shed a few tears reading through the book, knowing that there would be no new stories from him.

        He wrote some fiction and some travel books that tied in with his TV shows, exploring food around the world, as well as some cookbooks.  His Led Halle's cookbook has some great recipes and there are a couple recipes where his personality really shines through, but his Appetites cook book really is like being in the kitchen with him for each of the recipes.  Like cooking with an old friend.

        Laksa is a Maritime Asian noodle dish that is a blend of Chinese and Oceana cultures.  A flavorful broth heated to boiling, poured over rice noodles, shrimp, chicken, egg, beansprouts and cilantro.  I modified a little based on what I had on hand but I think that is kind of the point of this kind of a meal.  I started with homemade broth but you can use store bought or even a bullion base if you prefer.  

        Below is his recipe with a few modifications that I made, for instance he uses a bone in chicken breast which is fine and can add a little bit of flavor to the the broth but it won't add that much as it isn't cooked for very long.  The recipes for laksa paste and sambal belecam are include, again with slight modifications as noted below.  If there is an Asian market near you, you can purchase both of these there and save the time of making them yourself.

Now, Get in the Kitchen and Cook Something!

Laksa

            2 qt. Stock
            1 Boneless Skinless Chicken Breast
            ¾ c Laksa Paste (recipe Below)
            16 Jumbo Shrimp, shelled and deveined, shells reserved
            2 Eggs
            2 t Soy Sauce
            1 T Vegetable Oil
            8 oz. Rice Vermicelli
4 c Boiling Water
¾ c Coconut Milk
            2 c Bean Sprouts
            ¼ c Cilantro Leaves
            Sliced Red Chilis for Garnish
            Lime Wedges for Garnish
            Sambal Belecam (recipe below) or other hot sauce if desired
 

1.     Bring stock to a boil and add chicken breast, cook 12 minutes.  Turn off pot and let sit 12 more minutes

2.     Remove chicken from stock and shred meat, set aside

3.     Return pot to stove with laksa paste and shrimp shells, simmer 30 minutes

4.    Whisk eggs and soy sauce together in a bowl and heat a cast iron pan with oil

5.    Add eggs to hot pan and cook 2 minutes, flip and cook another minute and a half

6.    Put egg on a plate to cool slightly and cut into strips

7.    Bring a pot of water to a boil and pour over the rice vermicelli in a bowl, stir them to keep from sticking and let them sit for 5 minutes. Drain and set aside

8.    Strain the stock and bring back to a simmer and add shrimp to cook through, then remove and set aside

9.     Add coconut milk to the broth and bring to a boil then remove from heat

10.   Divide the chicken, shrimp, vermicelli, sprouts and egg among bowls

11.   Ladle broth over and serve with cilantro, chili peppers, lime wedges and sambal belecam


I like making things like this laksa paste, however this recipe makes a lot which is fine as it can be canned or frozen for use later.  I made it without the hot peppers and then made a small batch with the hot peppers added to it.  The blend of flavors is very different and my youngest son said "It smells and tastes weird!"  I think it was the star anise and cardamom that he was tasting but overall everyone else liked it.  This would also be great added to stir-fries or if you want to make pad thai! 

 Laksa Paste

            5 Shallots, peeled
            3 cloves garlic, chopped
            ½ c Galangal, Chopped or ¼ c Ginger
            3 Stalks Lemon Grass, white parts only, chopped
2 oz Macadamia nuts
½ c Peanuts
¼ c Sesame Seeds
1 T Cumin Seeds
¼ c Coriander seeds
3 Star Anise
3 Cloves
½ t Nutmeg
5 Cardamom Pods
(2 Fresh Serrano Chili peppers) Leave out for mild sauce
1 c Soy Oil
2 ½ T Salt
2 T Brown Sugar
4oz Tamarind Paste
½ c Water

1.       Combine shallots through cardamom pods and process in batches to grind into a paste

2.       Heat oil and cook paste over medium low heat for 1 hour

3.       Stir in salt, sugar, tamarind and water and stir for about 20 minutes


This was adapted from a recipe I found on line that called for shrimp paste, I didn't have any but I did have dried shrimp (Doesn't everyone?)  You can leave it out although it does add to the final flavor profile.  You could use a teaspoon of fish sauce if you want or like I said above you can add your favorite hot sauce if you like or leave it out all together.


Sambal Belecam

            10 g Dried Shrimp
                        1 T Water
                        4 Serrano Chili Peppers
                        2 Lime Juice
                        1 t Sugar
                        1⁄4 t Salt

            1.       Reconstitute shrimp in water for 15 minutes

            2.       Combine all and process to a smooth paste

                        3.       Place in a clear jar and store in the refrigerator 
  

Monday, December 14, 2020

Flat Iron Steak with White Grits and Roasted Red Pepper Pesto

Flat Iron Steak with White Grits and Roasted Red Pepper Pesto 


    About a week ago, I made some red pepper pesto for a pasta salad.  There was extra red pepper pesto so I stuck it in the fridge, not sure what I was going to do with it.  Today, when I wanted to add something different to my flatiron steak I thought it would be just the thing, and it was.  I also spread some on toast with an egg for breakfast add added it for a little kick in some homemade vegetable soup, it is really versatile stuff.

    I bought some white corn grits from amazon which came in a few days ago and had to check out Sean Brock's recommendation and it is very good as well.  The comfort just pours out of it and you can really contemplate how something so simple can be so good.  The corn flavor really shines through without being to buttery, paired with the steak and red pepper pesto and it was delightful, delicious, de-yummy!  Add a nice cabernet and it was even better.

Now, Get in the Kitchen and Cook Something!    

Roasted Red Bell Pepper and Arugula Pesto:

    1 c  Baby Arugula
    2 T Pecornio Cheese, shredded
    5 Kalamata Olives, roughly chopped
    1 T Balsamic Vinegar
    2 Cloves Garlic
    3 Red Bell Peppers, roasted 
    1/4 c Olive Oil
    Salt and Pepper To Taste
  1. In the bowl of a food processor combine the arugula, Pecorino cheese, olives, balsamic vinegar,  garlic and roasted red bell peppers and process until combined well about 30 seconds.
  2. Slowly add in the olive oiluntil combined.
  3. Season to taste with salt and pepper.
  4. Refrigerate until ready to use.


Seared Flat Iron Steak Salad
    2 lb. Flat Iron Steak
    Salt and Pepper
    2 T Olive Oil
    4 c Chopped Lettuce
    1/2 c Grape Tomatoes
    1/2 c Cucumbers, chopped
    1/2 c Beets
    1/2 c Pepper Rings
    1/4 c Sharp Cheddar Cheese, grated

  1. Heat a cast iron skillet over medium high heat.
  2. Sear the steak about 5 minutes per side in batches if necessary to prevent over crowding.  This should get the steaks to about 135 degrees for medium rare
  3. Let steaks sit 5 minutes
  4. Arrange lettuce, tomatoes, cucumbers, beets, pepper rings and cheddar on plates.
  5. Slice steaks across the grain and arrange on salads with a dolop of the red pepper pesto.
  6. Alternatively, serve with the white corn grits.


Creamy White Corn Grits
    1 c White Corn Grits
    2 1/2 c Water
    Additional 2 c Water for later
    1 t Salt
    2 T Butter
    Pepper To Taste

  1. Combine grits with two and a half cups of water and let soak overnight
  2. Bring grits to a simmer over medium heat, stirring until they start to thicken
  3. Add salt, reduce heat and cover
  4. Meanwhile in a seperate pan heat two cups of water
  5. Check grits every 10 minutes or so and stir, adding a little water at a time, you should end up adding about 1 1/2 c of water over the next hour.
  6. Stir in butter and season to taste with pepper and additional salt if necessary.

Friday, December 11, 2020

Christmas Cookies - Part 2 - The Model Clay Cookie


Christmas Cookies Part 2 - Model Clay Cookies

    I call thes model clay cookies because you can assemble them like you would clay beeds into logs and then slice them.  I know Pillsbury does this for you... but these are so much better.  I usuall make a double batch and then each batch is divided into to colors/ flavors.  Chocolate, Vanilla, Cherry, and Pistachio.  To make the Tree buttons I form a long triangle of green, attach a small roll of chcolate and then carefully wrap it in vanilla and roll.  Then slice and tadah!

Jonathan is making cherry candy canes,  two long wropes of red and white, twisted together and then cut to form candy canes.  I also made Christmas corn, spira ornaments and pistachio checkerboards.

Now, Get in the Kitchen and Cook Something!

Model Clay Cookies

Basic Dough Recipe

¾ c Butter

1 c Sugar

½ t Baking Powder

1 Egg

1 t Vanilla

2 c Flour


  1. Cream together butter, sugar and baking powder

  2. Add egg and mix 2 minutes

  3. Add vanilla and stir in

  4. Add flour until just combined


Color/Flavor Variations

Chocolate – Add 2 T Unsweetened Chocolate

Cherry - Add a few drops of cherry flavor and red food coloring

Pistachio – Add green food coloring and ¼ c Ground Pistachios


  1. Form into desired shapes and patterns

  2. Bake at 375º for 10 – 12 minutes


Wednesday, December 9, 2020

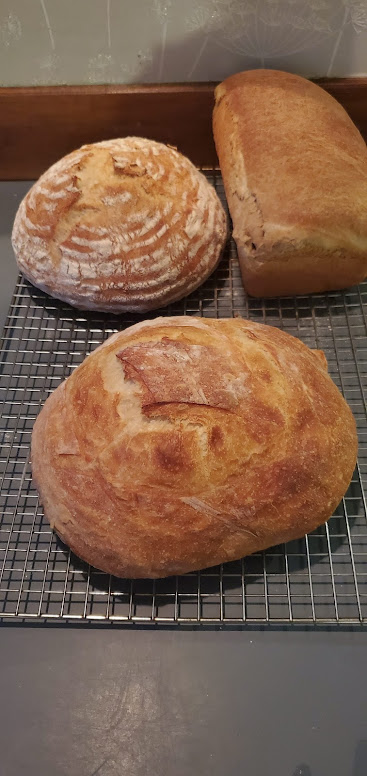
 Flour Water Salt Yeast


    I made some of the best bread ever today!   The recipe and technique is from Flour Water Salt Yeast by Ken Forkish.  If you want to make great bread this book is loaded with information.  Maybe too much but the recipes reiterate the highlights.  The two round loaves were a single batch of his Saturday White Bread.  From Start to finish was about 8 hours of time, but 6 of that was rising and 1 was baking, the loves were cooked separately in a Dutch oven  for 30 minutes each with a 5 minute Dutch oven reheat in between.

    I look forward to trying some of his other recipes, especially the bacon bread in the back of the book with chopped bacon in the dough.   Yummmm.  He starts by mixing the flour and water by hand until it is mostly incorporated, then lets it sit for about 30 minutes.  Next sprinkle the salt and yeast on top and then fold the dough by hand a couple times, wetting your hand to help dissolve the salt and keep the dough from sticking to you too much.

After folding a couple times you pinch the dough into several small pieces with one hand, turning the container with your other hand.  Then folding a couple more times.  The whole pinching and fold in process takes about 5 minutes.  Then you let it sit, folding it twice int he next hour and a half and then let it raise for 5 hours.

Form it into two loaves, preheat the oven to 475 degrees with the Dutch oven in it for 45 minutes.  Then Bake the bread one loaf at a time for 30 minutes.  Remove, cool slightly and then eat it.  It is definately worth the wait.  

The temperature can make a difference, if you start with room temperature flour, you can use about 95 degree water which will get you into the 77 degree range once the mixing, folding and pinching is done.  My house is usually a little on the cool side, so my dough temp was low and I could have let it raise longer but I went for it anyway.

Now, Get in the Kitchen and Cook Something

Based on Ken Forkish's Saturday White Bread.
    1000 g Flour
    720 g Water
    21 g Salt
    4 g Yeast
  1. Combine flour and water by hand until most of the dry flour is incorporated
  2. Cover and let rest 30 minutes
  3. Sprinkle flour and yeast on top of the dough and then fold the dough with one hand, pulling on one side of the dough and then folding it over the top.  
  4. Then turn the bowl 1/4 turn and do it again.
  5. Next pinch through the dough to divide it into 2 pieces, give the bowl a turn again and split both pieces in half, do it again splitting the four in halves.  Then one more time, at this point I found it hard to keep track but managed to get most of the pieces split and turned and mixed.
  6. Then I gave it two folds, because I felt like it and covered it with plastic and let it sit 30 minutes
  7. Give the dough 2 to 3 pull folds, turning the bowl 1/4 turn each time, cover and let rest 1 hour
  8. Give the dough another 2 -3 pull folds and then cover and let sit until about tripled in size, about 3 and 1/2 hours
  9. Dust the counter with a little flour and place the dough on it.
  10. Divide the dough in half and gently form it into a smooth round ball by folding it down on itself with a seam on the bottom.
  11. If you have a baneton basket or bread mold you can use it as I did for one loaf.  make sure it is floured well if it is not seasoned, I have used mine about 5 times and it is finally almost seasoned.  I need to use it more. and I will.  The second I left on the counter and scored the top.
  12. Preheat the oven with a Dutch oven in it to 475 degrees.  Let the dough raise for about 45 minutes or so until almost doubled and when you press down with a finger, it leaves a dent.
  13. Carefully put one loaf in the Dutch oven, put the lid back on and bake for 30 minutes.
  14. Remove from the oven and place the loaf on a rack to cool
  15. Put the Dutch oven back in the oven for 5 minutes to reheat
  16. Carefully transfer the second loaf to the Dutch oven and bake 30 minutes.
  17. Remove bread and cool on a rack
  18. Enjoy!


Christmas Cookies - Part 1


 Christmas Cookies - Part 1

    I don't make a lot of desserts, however when Christmas comes around I have a tendancy to over do it a little bit.  This year I went light, only about 12 differnt cookies/ bars etc.  That doesn't include the almond biscotti or hazelnut fig biscotti I made.  Nor does it include the apple strudel in the freezer or the breads I make as well.

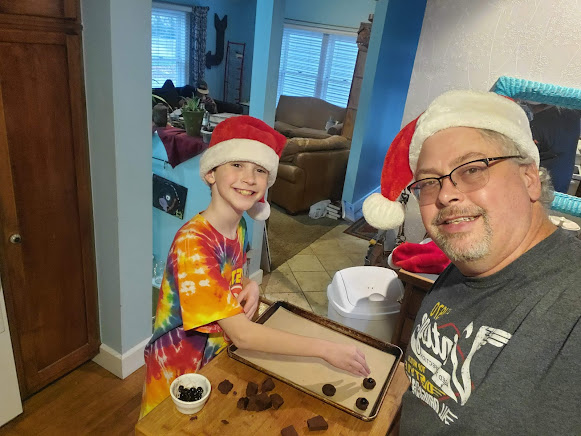
    This year I am starting off with my favorite, the Chocolate Cordial Cookie.  It is a rich chocolate cookie, topped with a cherry and then a quick fudge frosting that is baked onto the cookie.  Thats what my elf is doing in the picture above.  This year I didn't have any of the cheap bright red cherries that I usually use but I did have some good luxardo cherries in the fridge for old fashioneds.  I used though, those are the dark bits of goodness in the bowl next to Jonathan.  I will never go back, the only thing I didn't like about the cookies before was the plastic feel of the cherries.  These were way better.

Now, Get in the Kitchen and Cook Something!

Chocolate Cordial Cookie

½ c Butter

1 c Sugar

1 Egg

1 ½ t Vanilla

1 ½ c Flour

½ c Cocoa

1/4 t Salt

1/4 t Baking Powder

1/4 t Soda

Drained Maraschino Cherries

Frosting

1 c Chocolate Chips

½ c Sweetened Condensed Milk

1/4 t Salt

1 ½ t Cherry Juice


  1. Cream together butter and sugar

  2. Add egg, vanilla and cocoa, mix well

  3. Stir in salt, flour, baking soda and baking powder, mix until combined

  4. Roll dough into 1-inch balls and press down with your thumb to make an indent, top with half of a cherry

  5. Mix frosting ingredients and brush over cherry

  6. Bake 12 minutes at 375º